Blog นี้เงียบเหงามานานมากเพราะที่หายไปเน้นไปเขียน Blog ที่ medium.com เป็นหลักแต่เลือกที่จะเขียน content นี้ที่นี่เพราะอยากให้มีอะไรอัพเดทที่ Blog นี้บ้าง

ที่มาสำหรับบทความนี้
codemania 1001 ที่เพิ่งผ่านพ้นไป ได้เลือกที่จะเข้าร่วม session Blockchain Dev เป็น workshop ในช่วงเวลา 2 ชั่วโมงที่คุ้มค่ามาก ถึงแม้จะไม่ได้นำ Laptop ไปแต่ก็ไม่พลาดที่จะจดเนื้อหาแล้วเอามาเขียนในบทความนี้
อธิบายหลักการที่ความเข้าใจส่วนตัวหลังจากได้เข้าร่วม workshop Blockchain Dev ในเวลา 2 ชม.
- Ehtereum จะมีเครือข่ายโดยเฉพาะที่กระจายอยู่แต่ละที่โดยจะใช้คำเรียกว่า Node ซึ่งมีอยู่ทั่วโลก
- การทำ Transaction บน Ethereum จำเป็นต้องมีการจ่ายค่าธรรมเนียมที่เรียกว่าค่า “Gas”
- การที่จะทำ Transaction ได้นั้นจำเป็นต้องมีกระเป๋า “Wallet” เพื่อใช้เอาไว้เก็บ Coin โดยจะมีสิ่งที่สำคัญอยู่ 2 อย่างคือ public key ,private key
- private key เปรียบได้กับรหัสบัตรประชาชนของเราซึ่งจะไม่มีทางซ้ำกับคนอื่นได้แน่นอน
- public key (address) เปรียบได้กับบัญชีธนาคารซึ่งการที่จะสร้างบัญชีใหม่ได้จำเป็นต้องใช้ private key เป็นส่วนประกอบในการสร้าง เปิดเผยได้และใช้รหัสสำหรับอ้างถึงบัญชีรับ
ทำความรู้จักเครื่องมือต่าง ๆ ในสำหรับการเริ่มพัฒนา
- Remix Ethereum IDE Online เป็นเครื่องมือใช้เขียน Code ,Compile ,Deploy
- MetaMask (Browser Extension) ใช้เป็น Program แทนกระเป๋าเงิน (Chrome ,Firefox ,Opera)
- Web Server for Chrome เอาไว้ใช้เป็น web server run static web (เป็นตัวเลือก ถ้ามี tool อื่น run static web ได้ก็แทนได้เหมือนกัน)
เริ่ม workshop กัน
-
- ติดตั้ง MetaMask Chrome Extension และ Register ให้เรียบร้อย ขั้นตอนตรงนี้ขอข้ามไปนะ

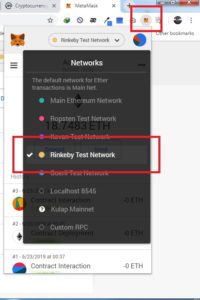
- เมื่อได้ Create account ที่ Metamask เรียบร้อยแล้ว จะเริ่มขั้นตอนการเติม Coin เข้า Wallet ช่องทางการเติมเงิน (ETH coin) จะร้องขอได้ที่ Ethereum Node Test เช่น Kovan ,Rinkeby ,Kulap (Ethereum สัญาชาติไทย) เป็นต้น
- ต้องเปลี่ยน Network ของ Ehtereum Node เป็นของ Rinkeby Test Network
- เข้าลิ้ง https://www.rinkeby.io/#faucet โดยทาง Node จะให้เราแชร์ public key (address) บน Social Network (Facebook,Twitter,…) แบบเปิด public post จากนั้น copy link ของ post นั้นมาใส่
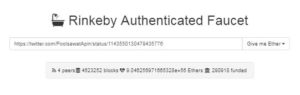
- 3 Ethers / 8 hours
- 7.5 Ethers / 1 day
- 18.75 Ethers / 3 days
- รอ.. สังเกตุ wallet เราก็จะมี token เพิ่มเข้ามา เราก็พร้อมจะไป step ถัดไป
- เริ่มเขียน code เข้าไปที่ลิ้ง https://remix.ethereum.org เลือก code ด้วย solidity
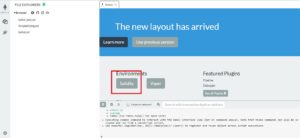
- เลือกเมนู File Explorers กดบวก สร้างไฟล์ ตั้งชื่อไฟล์ว่า “SimpleVoting.sol” และใส่ code ข้างล่างนี้
This file contains bidirectional Unicode text that may be interpreted or compiled differently than what appears below. To review, open the file in an editor that reveals hidden Unicode characters. Learn more about bidirectional Unicode characterspragma solidity ^0.5.0; pragma experimental ABIEncoderV2; // specifies what version of compiler this code will be compiled with contract Voting { /* the mapping field below is equivalent to an associative array or hash. */ mapping (string => uint256) votesReceived; /* Solidity doesn't let you pass in an array of strings in the constructor (yet). We will use an array of bytes32 instead to store the list of candidates */ string[] public candidateList; /* This is the constructor which will be called once and only once - when you deploy the contract to the blockchain. When we deploy the contract, we will pass an array of candidates who will be contesting in the election */ constructor(string[] memory candidateNames) public { candidateList = candidateNames; } // This function returns the total votes a candidate has received so far function totalVotesFor(string memory candidate) public view returns (uint256) { return votesReceived[candidate]; } // This function increments the vote count for the specified candidate. This // is equivalent to casting a vote function voteForCandidate(string memory candidate) public { votesReceived[candidate] += 1; } function candidateCount() public view returns (uint256) { return candidateList.length; } } - กด Crtl + S เพื่อ save file

- Deploy ใส่ input ที่ใน code จะให้ใส่ค่าเป็น Array ให้ใส่ [“Google”,”Line”,”Facebook”] เพื่อใช้เป็น Choice Vote จากนั้นกด Deploy
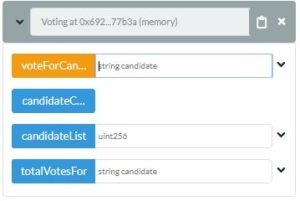
- VoteForCan… สำหรับ Test Vote
- candidateC…
- candidateList get Choice Vote โดยส่ง index จะได้ item ใน List
- totalVotesFor ดูสถานะ Total Vote รวม
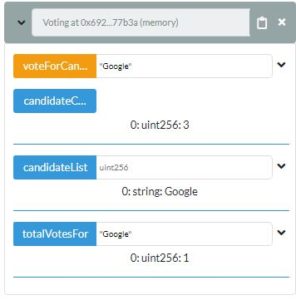
- ทดสอบ Vote
- ใส่ “Google” กด Vote ไป 2 ครั้ง
- ตรวจสอบสถานะของ “Google” จาก totalVotesFor จะได้ 2
- ติดตั้ง MetaMask Chrome Extension และ Register ให้เรียบร้อย ขั้นตอนตรงนี้ขอข้ามไปนะ
 by
by ทั้งหมดนี้ของบทความต้องขอขอบคุณตัวอย่าง code workshop จาก Kulapio Githup