สวัสดีทุกคน ห่างหายไปนานมาก ๆ ช่วงนี้พอที่จะมีเวลามาเพิ่มบทความที่เกี่ยวกับความรู้เรื่อง java กันซะหน่อย พอดีได้ลองใช้งาน Spring Boot 3 ด้วย Reactive Programming เลยอยากที่จะแชร์บทความเพื่อเป็นความรู้สำหรับเพื่อน ๆ Java developer ที่ยังสนุกกับ java อยู่ยังไม่ย้ายไปไหน
เริ่มกันที่คำว่า Reactive คืออะไร
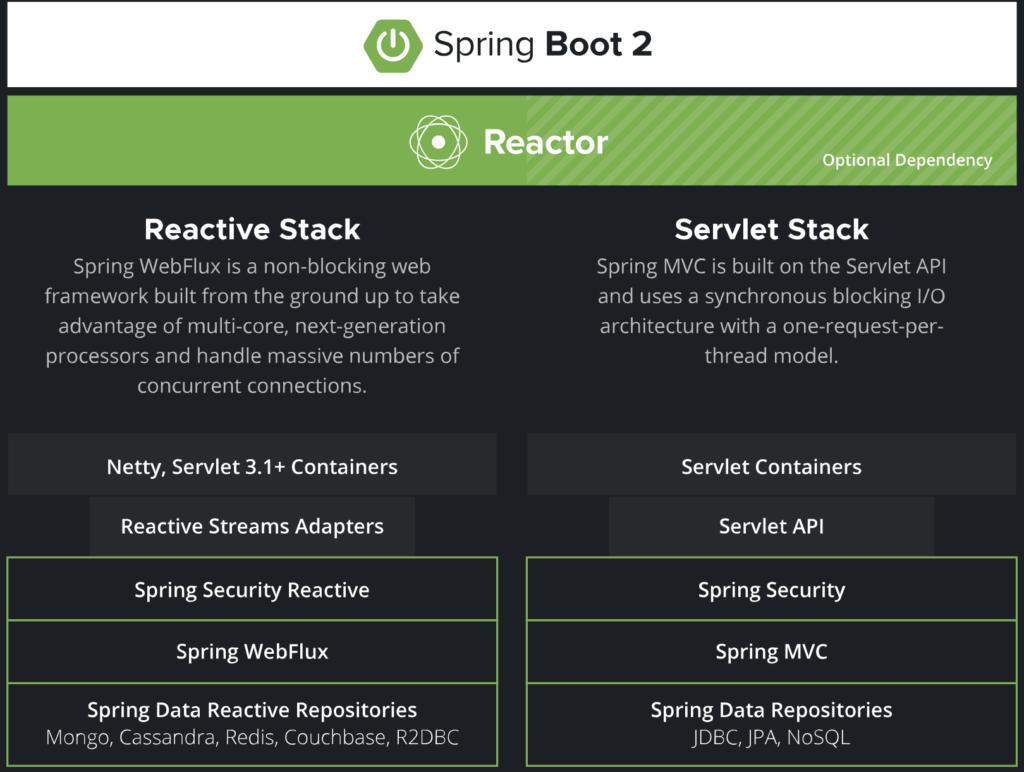
Reactive programming เกี่ยวกับ asynchronous, non-blocking และ event-driven data processing ด้วย asynchronous streams ใน reactive programming ทุกๆอย่างเป็น stream ที่รู้จักกันดีในชื่อ Observer Pattern ขอยกตัวอย่างกับการใช้งานด้วย Servlet Stack ที่เป็นการพัฒนาเว็บแอพพิเคชั่นในยุคก่อน ๆ จนถึงปัจจุบัน

ส่วนที่เป็นข้อแตกต่างที่เห็นได้ชัดเจนที่เกี่ยวกับ Reactive ที่เป็น Non blocking I/O และ Servlet blocking I/O นั้นคือข้อแตกต่างที่เป็นขอได้เปรียบของการใช้งาน Reactive Programming นั้นเอง สำหรับ Spring Reactive จะอยู่ในรูปแบบการ Webflux style
ข้อแตกต่าง Servlet vs Reactive (WebFlux)
| หัวข้อเปรียบเทียบ | Servlet Stack | Reactive (WebFlux) Stack |
|---|---|---|
| Web Server | Tomcat | Netty |
| I/O | Blocking | Non-Blocking |
| Request Processing | Sychronous (Thread Pool) | Asychronous (Event Loop) |
| Http Request | javax.servlet.http.HttpServletRequest | org.springframework.http.server.reactive.ServerHttpRequest |
| Http Response | javax.servlet.http.HttpServletResponse | org.springframework.http.server.reactive.ServerHttpResponse |
| Filter | org.springframework.web.filter.OncePerRequestFilter | org.springframework.web.server.WebFilter |
| Interceptor | org.springframework.web.servlet.HandlerInterceptor | N/A |
มาเริ่มต้นใช้งาน Spring Webflux เพื่อสร้าง Reactive RESTful Web Service กันเถอะ
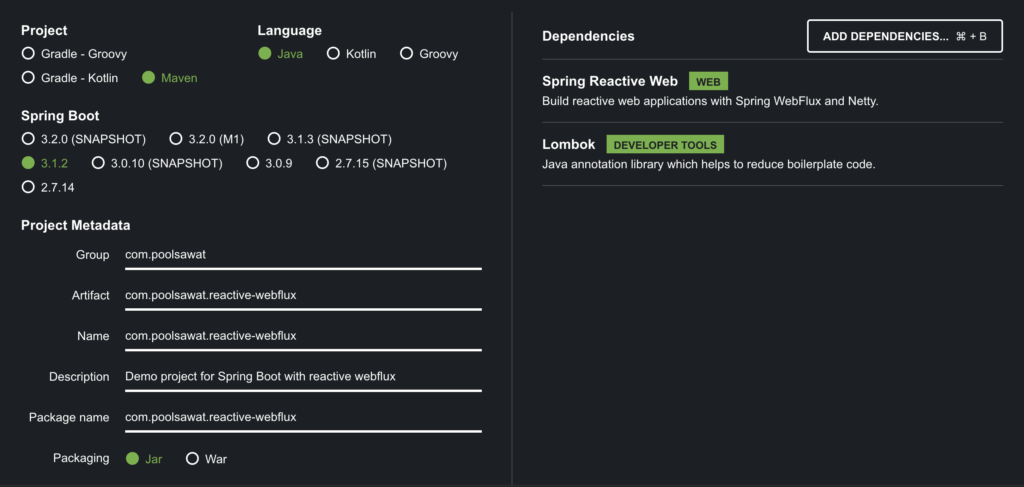
- เริ่มด้วยให้ทำการไปที่ https://start.spring.io/ และใส่รายละเอียดโปรเจค

ส่วน Dependencies ที่จำเป็นต้องเพิ่ม
- Spring Reactive Web (Webflux and Netty)
- Lombok
และทำการ Import Project เข้า IDE หรือ Editor และทำต่อในขั้นตอนถัดไป

มีส่วนที่ต้องเพิ่ม 3 ส่วน เบื้องต้น
1. src/main/resources/application.properties
server.port=8443

spring.webflux.base-path=/reactive
2. src/main/java/com/poolsawat/reactivewebflux/controllers/ReactiveController.java
package com.poolsawat.reactivewebflux.controllers;

import com.poolsawat.reactivewebflux.services.ReactiveService;
import org.springframework.beans.factory.annotation.Autowired;
import org.springframework.web.bind.annotation.GetMapping;
import org.springframework.web.bind.annotation.RestController;
import reactor.core.publisher.Mono;

import java.util.List;

@RestController
public class ReactiveController {

    @Autowired
    private ReactiveService reactiveService;

    @GetMapping(value = "/welcome")
    public Mono<ResponseEntity<List<String>>> welcome() {
        return reactiveService.getReactiveListItems().map(ResponseEntity::ok)
                .defaultIfEmpty(ResponseEntity.notFound().build());
    }

}
3.1 src/main/java/com/poolsawat/reactivewebflux/services/ReactiveService.java
package com.poolsawat.reactivewebflux.services;

import reactor.core.publisher.Mono;

import java.util.List;

public interface ReactiveService {
    Mono<List<String>> getReactiveListItems();
}
3.2 src/main/java/com/poolsawat/reactivewebflux/services/impl/ReactiveServiceImpl.java
package com.poolsawat.reactivewebflux.services.impl;

import com.poolsawat.reactivewebflux.services.ReactiveService;
import org.springframework.stereotype.Service;
import reactor.core.publisher.Mono;

import java.util.List;

@Service
public class ReactiveServiceImpl implements ReactiveService {
    @Override
    public Mono<List<String>> getReactiveListItems() {
        return Mono.just(
                    List.of("Project Reactor","RxJava","RxJS","Rx.NET","RxScala",
                            "RxClojure","RxKotlin","RxSwift","RxGo","RxPHP")
        );
    }
}
ทำการ start application server ด้วยคำสั่ง `mvn spring-boot:run`
ทดสอบการเรียก route /welcome ด้วยคำสั่ง `curl -X GET http://localhost:8443/reactive/welcome`
จะได้แบบนี้
[
"Project Reactor",
"RxJava",
"RxJS",
"Rx.NET",
"RxScala",
"RxClojure",
"RxKotlin",
"RxSwift",
"RxGo",
"RxPHP"
]
สรุปท้ายบทความ
ผมไปเจอบทความเกี่ยวกับ Spring Reactive Webflux เป็น community ของกลุ่มคนไทย ดีมาก แนะนำให้เข้าไป contributes https://github.com/jittagornp/spring-boot-reactive-example
Github Source code -> https://github.com/pool13433/spring-reactive-webflux